Tutorials → How to Build Apps
Delete an Object
Let's see what we want to add to our Snag List app next:
App Design: Construction Snag List
Sometimes the user will add incorrect snags and would need to remove them again. Therefore, we need a feature allowing us to delete snag items.
Let's add a "Delete Selected Item" button to our Main View XML using the button - js auto-complete template that is similar to the "View Selected Item" button we already have. We'll specify onpress="deleteItem", implying that we'll add a JavaScript function that will delete the selected item:
Now add that JavaScript function to the Main View JavaScript. Note that to destroy an object, we simply call its destroy() function:
If you test this on a mobile device, you'll see that the item is immediately deleted from the list when you press the button.
Normally, it would be advisible to add another View as a confirmation screen that confirms whether the user is sure they want to delete the item, but to keep things simple, we haven't implemented it as such in this case.
Modify an Existing Object
We head on to our next requirement:
App Design: Construction Snag List
Our app allows us to add new snag list items which have a status of "Open", but we need a feature to allow the user to mark a snag item as "Completed" or "Closed" when the snag has been taken care of.
For the sake of variety, we'll show a confirmation screen to the user, confirming that an item has been marked as complete.
Let's add this feature to the "View Item" screen of our app. Open up the view_item view and add a button to the View XML alongside the existing "Back to Main Menu" button and components. Once again, use the button - js auto-complete template and specify a function name of your choice for onpress as follows:
We specified onpress="markAsComplete" above, so let's add that function on the JavaScript side:
Remember that we also want to show a confirmation screen after the item has been marked as complete, so let's add a link for that purpose, using the link (with arg) auto-complete template again. Note that we send item, which is a parameter in this view, as an argument to the next view. This is quite a common practice in JourneyApps when we take the user through a process that deals with the same data throughout a number of views — we often pass the same parameter in our current view as an argument to the next view several times.
Before we complete this feature, a word about Links:
Different Ways of Triggering Links
Up until now, you've seen how we directed the user to different screens in our app using Links that are trigged by buttons. We used the syntax: <button link="" />
It is also possible to trigger links from JavaScript functions, which is useful for our "Mark as Complete" feature, since we want to change our snag item's Status to "Complete", and then take the user to a confirmation screen.
This is accomplished as follows:
In other words, we can trigger our Links from JavaScript using the return link.name_of_link() syntax, and then we pass arguments directly in the JavaScript function call (in this case, we're passing item to the confirmation screen view).
Furthermore, when triggering links from JavaScript and passing in arguments, the <arg /> in the <link> is optional. This is because we are already specifying arguments when we call the return link.name_of_link() function (in the above example, our argument is view.item). Therefore, in this case, we could also have specified our mark_as_complete link as follows:
Side Note: Branching
A quick side note before we continue: Being able to trigger links from JavaScript opens up a powerful possibility: We can implement custom logic in JavaScript that determines to which view we send the user (i.e. which link we trigger). This means that we can effectively create "branching points" in our app. This is very useful for use cases such as:
- Showing different variations of views depending on certain criteria or what the user selected. For example, we can create different user roles that have access to different functionality in our app.
- If we are building a sales app, doing cross-selling of products if the customer matches certain criteria.
- Forcing the user to specify additional information under certain circumstances
- ...and so on
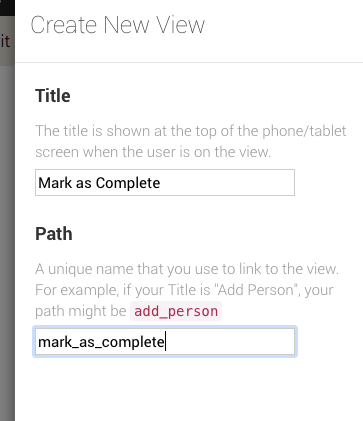
Create the "Mark as Complete" View
Now let's create the "Marked as Complete" view:
We add a parameter again just like in our "View Item" view, and then some components:
We're not done yet! Head over to the next section where we'll finish this part of our Snag List app.