Tutorials → How to Build Apps
Use "Clickable" Lists
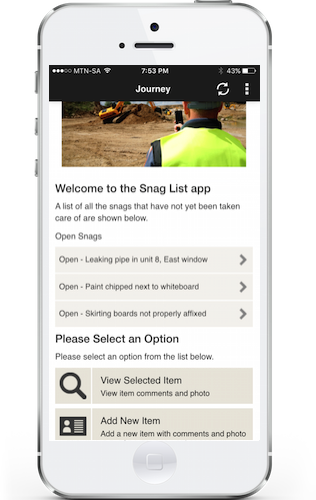
Taking a look at the list of snags on our Main View: Currently, in order to view a snag item, the user has to select the item from the list and then scroll down to press "View Selected Item". If the list of snags gets quite long, this will require excessive scrolling and thus make for a poor user experience.
JourneyApps supports an alternative style of lists that we call "Clickable" Lists. These lists essentially allow you to call a JavaScript function (and potentially trigger a link to a next view), whenever the user "clicks"/touches a list item.
Remove Some Old Components
Before we implement a clickable list on our Main View, first of all, let's remove some things from our View XML that we'll no longer need:
- The
selected_itemvariable (and any references to it, for example<arg bind="selected_item"/>— recall that<arg />is optional when triggering a link from JavaScript) - The existing
<list>component. - The "View Selected Item" and "Delete Selected Item" buttons in the
<menu>(the clickable list will supercede the "View Selected Item" button, and we can move our "Delete Item" feature to the "View Snag Item" screen instead).
Add the "Clickable" List Component
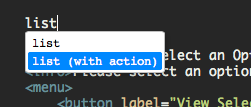
Then use the list (with action) auto-complete template to add a clickable list as shown:
Now fill in the XML as shown below. We're telling our list to call a JavaScript function named viewItem when the user taps on a snag item in the list.
When we define that function in the View JavaScript, it needs to accept a parameter — the selected item will be passed as an argument when the user "clicks" on an item in the list. We can then trigger a link directly from this function to the "View Snag Item" screen:
Test on Mobile Device
![]() Refresh your mobile app. You'll notice that list items now have a chevron icon to the right, which indicates that they are "clickable". Clicking on an item will take you directly to the "View Snag Item" screen, instead of merely highlighting the selected item as before.
Refresh your mobile app. You'll notice that list items now have a chevron icon to the right, which indicates that they are "clickable". Clicking on an item will take you directly to the "View Snag Item" screen, instead of merely highlighting the selected item as before.