Push Notifications
Introduction

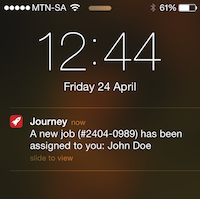
JourneyApps supports sending push notifications addressed to specific users of a JourneyApps application. This is particularly useful for notifying users of certain events, such as when a job is assigned to them.
Push notifications can be configured for a specific object type in your Data Model, and a notification is triggered whenever an object of that type is created in any way on JourneyApps (for example: from the mobile device, on the JourneyApps App Backend, or via the JourneyApps API)
The recipient of the push notification is determined by a "belongs to user" relationship on the object.
Configuration
Push notifications are configured in the Data Model of your app, in the JourneyApps Editor.
To configure push notifications to be sent when a specific type of object is created, add a<notify-user message="" received-field="" recipient-field=""/> element at the end of an <object/> definition.
The configuration options in the <notify-user/> tag are as follows:
| Configuration Option | Description |
|---|---|
message="" |
Message that will be displayed to the user in the push notification. It is a Format String, so attribute values from the object can be dynamically interpolated into the message (see Example 1 below). |
received-field="" |
The name of a datetime attribute where JourneyApps will automatically store a timestamp indicating when the push notification message was read. |
recipient-field="" |
The name of a belongs to relationship on the same object that indicates who the recipient of the push notification should be. The object type of the relationship must be the mobile user type (user by default) |
Example 1: Job Assignment Notification
In the example below, we send a push notification to a user whenever a job_card object is created. Each job card belongs to the user to which it is assigned, so we notify the assigned user that they have received a new job card.
You may try out Example 1 by copying the Field Service Job Cards template app in the JourneyApps Editor and adding the received_at attribute and the above <notify-user/> element to the job_card object type in the Data Model. To test the push notifications, create a new Job Card in the JourneyApps App Backend and ensure to specify the "belongs to user" relationship as your mobile user.
Example 2: General Message Notification
A more flexible way to use push notifications is to create a dedicated object type for the notifications. In this way, any message can be sent to any user simply by creating such a "notification" object. You could also send the same message to multiple users by looping through your users and creating a "notification" object for each user.
Note that you can choose any name for the "notification" object type. It does not have to be called notification — the <notify-user/> element is the only aspect of the above example that determines that the object will trigger push notifications.
Push Notification Behavior
If the user taps on a Push Notification, the JourneyApps Container app will be opened, and a data sync will be triggered automatically.
If the app was running in the background, it will be opened on the same screen where it was open before. If the app was not running, it will be opened on the main screen.
Limitations & Cautions
- iOS: If an iOS user receives a push notification while the app is open on their device, they will not see any indication that a push notification was received. iOS users will only see push notifications if they do not have the app open.
- Please be aware of the limitations to Push Notification inherent to Android and iOS: The Apple Push Notification Service (Apple's service used on iOS) and Google Cloud Messaging (Google's push notification service used on Android and Chrome) doesn't guarantee delivery of push notifications, and there may be delays in the delivery of notifications due to external factors, including network connectivity.
