Tutorials → How to Build Apps
Now that we've successfully built the Hello World app, we'll be diving into the technical aspects of building apps on JourneyApps in detail.
Data Model Introduction
The Data Model is used to customize the "database" that will be used by your JourneyApps mobile apps. JourneyApps supports simple standard relational data models:
- You define the various Object Types that you require.
- Each Object Type specifies various Attributes that are stored in an object of this type.
- Relationships (for example, one-to-many) can be defined between different Object Types (this will be covered in a later section of the tutorial).
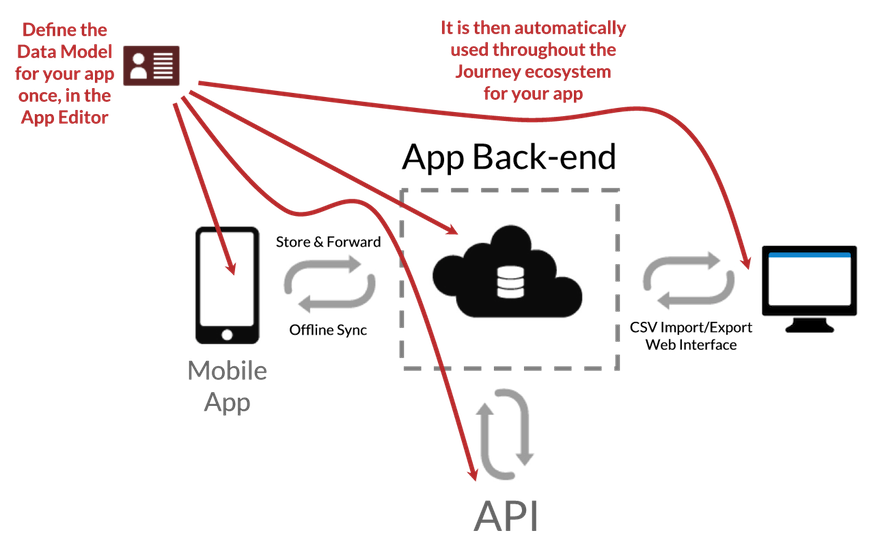
Single, Common Data Model
An important thing to note when it comes to JourneyApps is that you define a single, common data model that is automatically used for all parts of the JourneyApps "ecosystem". Recall the Global Automatic Data Sync section of the JourneyApps: The Big Picture tutorial: Once you've defined your Data Model in the App Editor, it will automatically be used for the Mobile App, App Back-end (with CSV import and data browser), and API.
A Real-World Example
We mentioned that we'll use a real-world example of an app throughout the tutorial, and you saw in the JourneyApps Approach to Building Apps section of the JourneyApps: The Big Picture tutorial that the Data Model is the best place to start when you build an app on JourneyApps. So let's introduce our real-world example app and then build the Data Model for it:

Real-World Example: Construction Snag List
In the construction and real estate industries, a "snag list" is often created to keep inventory of the things that an owner or tenant isn't happy with when a building project is finished or when they move into a new leased building.
Things that could appear on a snag list include: Cracks in ceiling and walls, skirting boards that aren't properly affixed, uneven or unfinished plasterwork, crooked fixtures, loose wiring, poor insulation, leaking pipes, etc.
A great alternative to compiling and maintaining a snag list manually is to build a mobile app on JourneyApps that allows capturing and centralized tracking of snag list items electronically. Photos, notes and GPS locations can easily be attached to each item, and it is easy to export the snag list and send it to someone, or to build a web portal that pulls data from to the JourneyApps API where stakeholders can browse the snag list.
Create the Snag List App & Link Test Device
We will now create a new blank app to start building the Snag List app:
Important: Start Again with a New App
Repeat the instructions in Section 2: Creating a New App to create a new app named "Snag List", and then link your mobile device to that app using the Test tab.
Open up the Data Model
Now go to the Data Model tab of your newly created Snag List app. You should see the following:
![]()
What you see is a visualization of your app's Data Model. Notice that any new JourneyApps application that you create starts with a single object type in its Data Model, called user. This is used to store information about mobile users of your app. By default, the user object type has one attribute, name, which stores the user's name.
Now click on the Edit XML tab. You should see the following:
This is the XML code that you'll use to customize your Data Model. The visualization of the Data Model that you saw in the previous picture is automatically generated based on this XML code — here you can see the user object type with its name attribute. Whenever you modify your Data Model XML, the visualization will be updated automatically.
Building the Data Model
Let's look at what the requirements are for our Snag List app's Data Model:
App Design: Construction Snag List
The simplest Data Model for our Snag List App is simply to have a collection of snag list items, each with a photo, comments and status (Open/Closed). Our app will then allow users to capture new snag list items that are initially "Open", which they can then later change to "Closed" when the snag has been taken care of.
Add an Object Type
Therefore, we need to add a new object type to our Data Model named item. Below "Add object types here" in the XML, type object and then press Ctrl + Space as usual to auto-complete.
Fill in item as the name of the object type, and Item as the label (the name="" is what you use to refer to the object type in your code, whereas the label="" is a human-readable label for the object type that will be used if an object of this type is displayed to users.)
Add Some Attributes to the Object Type
Now add your first attribute, comments and specify its type as string (string denotes that we store text).
Next we want to add an attribute to store the photo of the snag list item. Type photo on the next line and hit Ctrl + Space as usual to auto-complete. This will give you a blank attribute for a photo. Fill in photo as the name and Photo as the label:
To add our last attribute for the "status" of our snag list item, we'll use the enum attribute type (which is short for enumeration — which is used to create a fixed "option list" of values that a specific attribute can take on). (A full guide to all the possible attribute types in JourneyApps can be found here)
Type enum on the next line and hit Ctrl + Space as usual to auto-complete, then fill in status for the name and Status for the label. You specify the list of values that this attribute can take on by putting them into <option> tags inside the enum. Therefore, set the contents of those tags to Open and Closed (Reminder: You can use Ctrl + . to move your cursor to the next place where you should enter something in the code).
Display Format
The last thing we need to customize is how our item objects will be displayed (e.g. when they are shown in a list). This is specified using the <display format="" /> tag that you can see below your attributes. Here, you can specify which attributes are included when the object is displayed. Attribute names are wrapped in curly braces, and you can also include some raw text. Let's make our Snag List items display their Status, followed by a hyphen and then their Comments:
You can learn more about display formats in detail in this section of the reference documentation.
That's It!
We've now created the Data Model for our Snag List app. This will now automatically be used to determine the structure of the "database" in your mobile app and elsewhere through the JourneyApps ecosystem (e.g. for storing your app's data in the cloud).